


Glitch'n Course
Let’s make some glitch art while learning about circuits!
-
Day 1 - Working with One Oscillator + 4040
-
Lesson 1: Blink an LED
Learn how to flash an LED using simple parts. In this circuit, a photocell controls how fast the LED blinks. We can trim the photocell legs to make it easier to put into the breadboard.
-
Lesson 2: Make some "clicks"
Remove the LED and resistor from your circuit. Add an audio jack and listen to the same signal.
-
Lesson 3: Use a knob to control the speed
Replace the photocell with a potentiometer. Now you can precisely set your circuit to a fixed tempo.
-
Lesson 4: Use a button to gate the sound
Add a button between the oscillator and the audio jack. This lets you control when your circuit makes sound.
-
Lesson 5: Add a filter
Combine a knob with a very small capacitor to sculpt the tone of the “click.” (For making electronic music, this step is essential, as the raw sounds from our circuits are often too harsh to listen to without some filtering. Ask yourself: is this sound pleasant? Or does it strain my ear?)
-
Lesson 6: Light Patterns
Remove the audio jack and filter portions of your circuit so that only the oscillator remains. Now we add a new part that generates interesting patterns, the 4040. We start with using LEDs to visualize these patterns.
-
Lesson 7: Drum Machine
Remove the LEDs and replace them with a combination of resistors, diodes, and capacitors. You can add LEDs as well, which will provide visual feedback but can also change how your circuit sounds. (At this stage, there is no right or wrong way to continue building the circuit. Test different combinations and see what you like.)
-
-
Day 2 - Working with Two Oscillators + 4040
-
Lesson 1: Set up a slow oscillator (review)
We start by setting up an oscillator, just as we did in Day 1. We want it to be slow, for now, so we use a large capacitor (100 uF).
-
Lesson 2: Add a second (slow) oscillator
We now add a second slow oscillator (100 uF). We mix them together using resistors or diodes. What changes when we switch between these different components?
-
Lesson 3: Two faster (tonal) oscillators (Blade Runner!)
Replace both capacitors with smaller ones (10 uF). Try to set them both to the same “speed” and listen to how it sounds.
-
Lesson 4: AM Radio Transmitter
Now we replace one of our capacitors with a very small one (68 pF). This oscillator now oscillates way above what we can hear. We modulate this very fast oscillator with our “tonal” oscillator. The result: our tone is broadcast to a nearby AM radio!
-
Lesson 5: Rebuild the 4040 Drum Machine (Review)
Leave your two oscillators in place while removing other components. The goal is to rebuild the 4040 “Drum Machine” from Day 1.
-
Lesson 6: Wonky beats with 4040 "Reset"
The 4040 has a special pin that “resets” the pattern it generates. If we connect our second oscillator to it, we can reset it automatically, creating strange, “wonky” beats.
-
Lesson 7: Glitch with "Voltage Starving"
We simulate a low or dying battery by deliberately “starving” our circuit of power, which creates unpredictable, chaotic behavior. This is a quick way to make any circuit much more interesting!
-
-
Day 3: Microsound & Generative Beats (4021)
-
Lesson 1: Prepare two Oscillators
Set up a slow oscillator (100 uF) and fast oscillator (10 uF). Probe with your speaker to make sure they’re working.
-
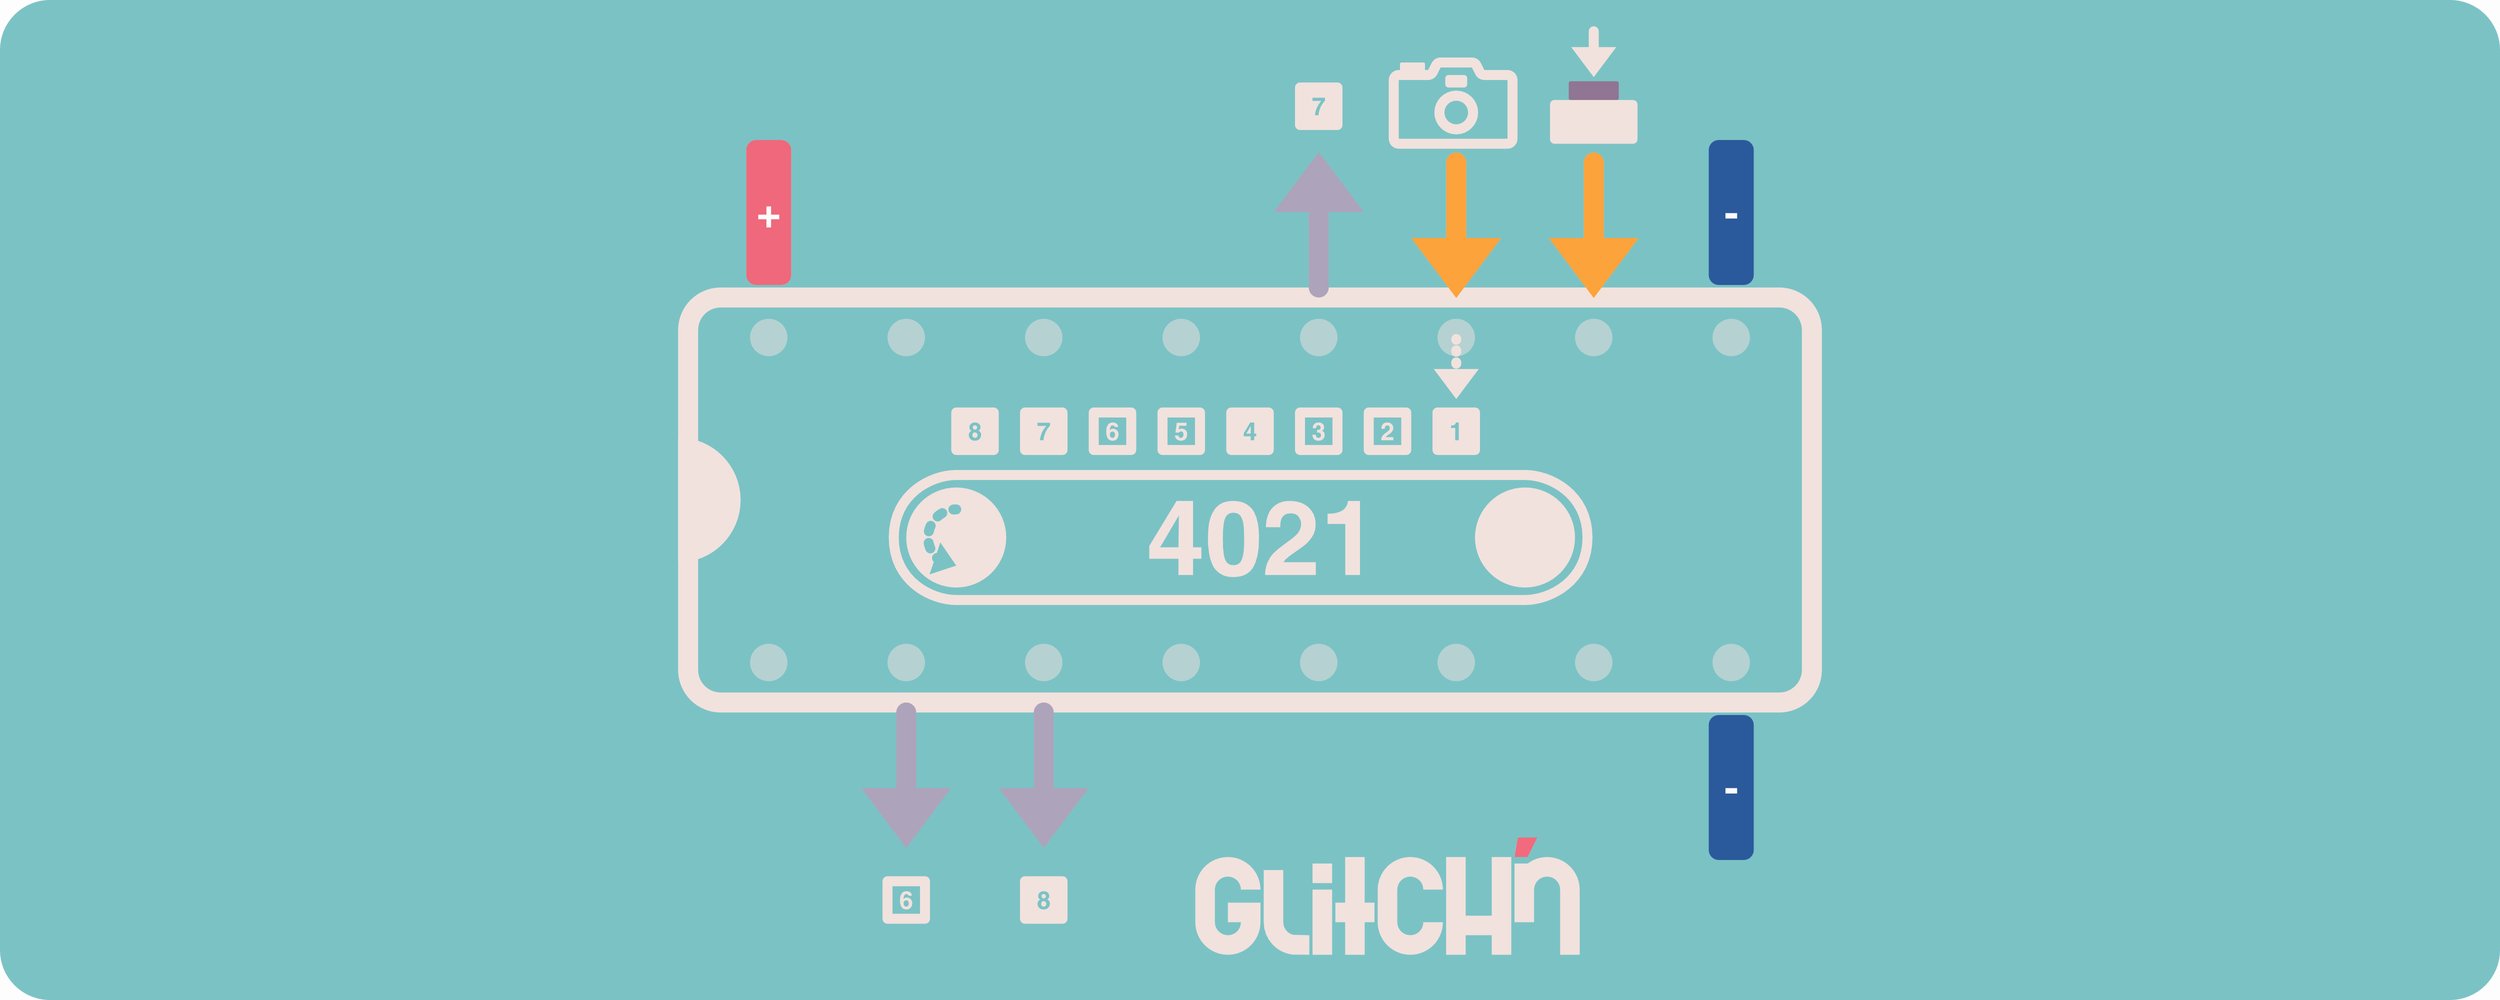
Lesson 2: Complex Patterns with the 4021
The two oscillators you prepared will drive a new part, the 4021, which produces 3 interesting outputs. We first use it to animate some LEDs.
-
Lesson 3: Repetetive 4021 Drummer
The slow oscillator you prepared controls the tempo of this drummer. The second oscillator does something remarkable: changing its speed locks the drummer into a new pattern. If the oscillator speed remains stable, the pattern repeats.
-
Lesson 4: Microsound 1 - Subtle Composition
In this short lesson, we use a small capacitor, then an LED, to shape the sound of the drummer. Taming the harshness of the “clicks” we’re making is an important part of the musical process. Music that contains subtle textures like these is sometimes called “microsound.”
-
Lesson 5: Generative 4021 Drummer
Remember that one of our knobs establishes and “locks” a unique pattern that repeats. But what if we want a pattern that is always shifting and varying - a generative pattern? Simply replace the knob with a photocell. This makes the oscillator less steady, which makes the patterns the 4021 produces constantly evolve.
-
Lesson 6: Microsound 2: Deep Sculpting
To remove even more of the “thud” from your circuit, you can construct a high-pass filter that removes the remaining low “thumps.” Now we are really into “microsound” territory!
-
Lesson 7: Glitch as Musical Structure
Electronic musicians sometimes create structure by alternating between phases of “normal” operation and “glitched” operation. We achieve that here by using voltage starving. A large (100 uF) capacitor can be added in this circuit to add some stability.
-
-
Day 4 - Stepped Filters with the 4051
-
Lesson 1: Prepare Two Slow Oscillators
Prepare two slow oscillators (100 uF) and test them with LEDs to make sure they work.
-
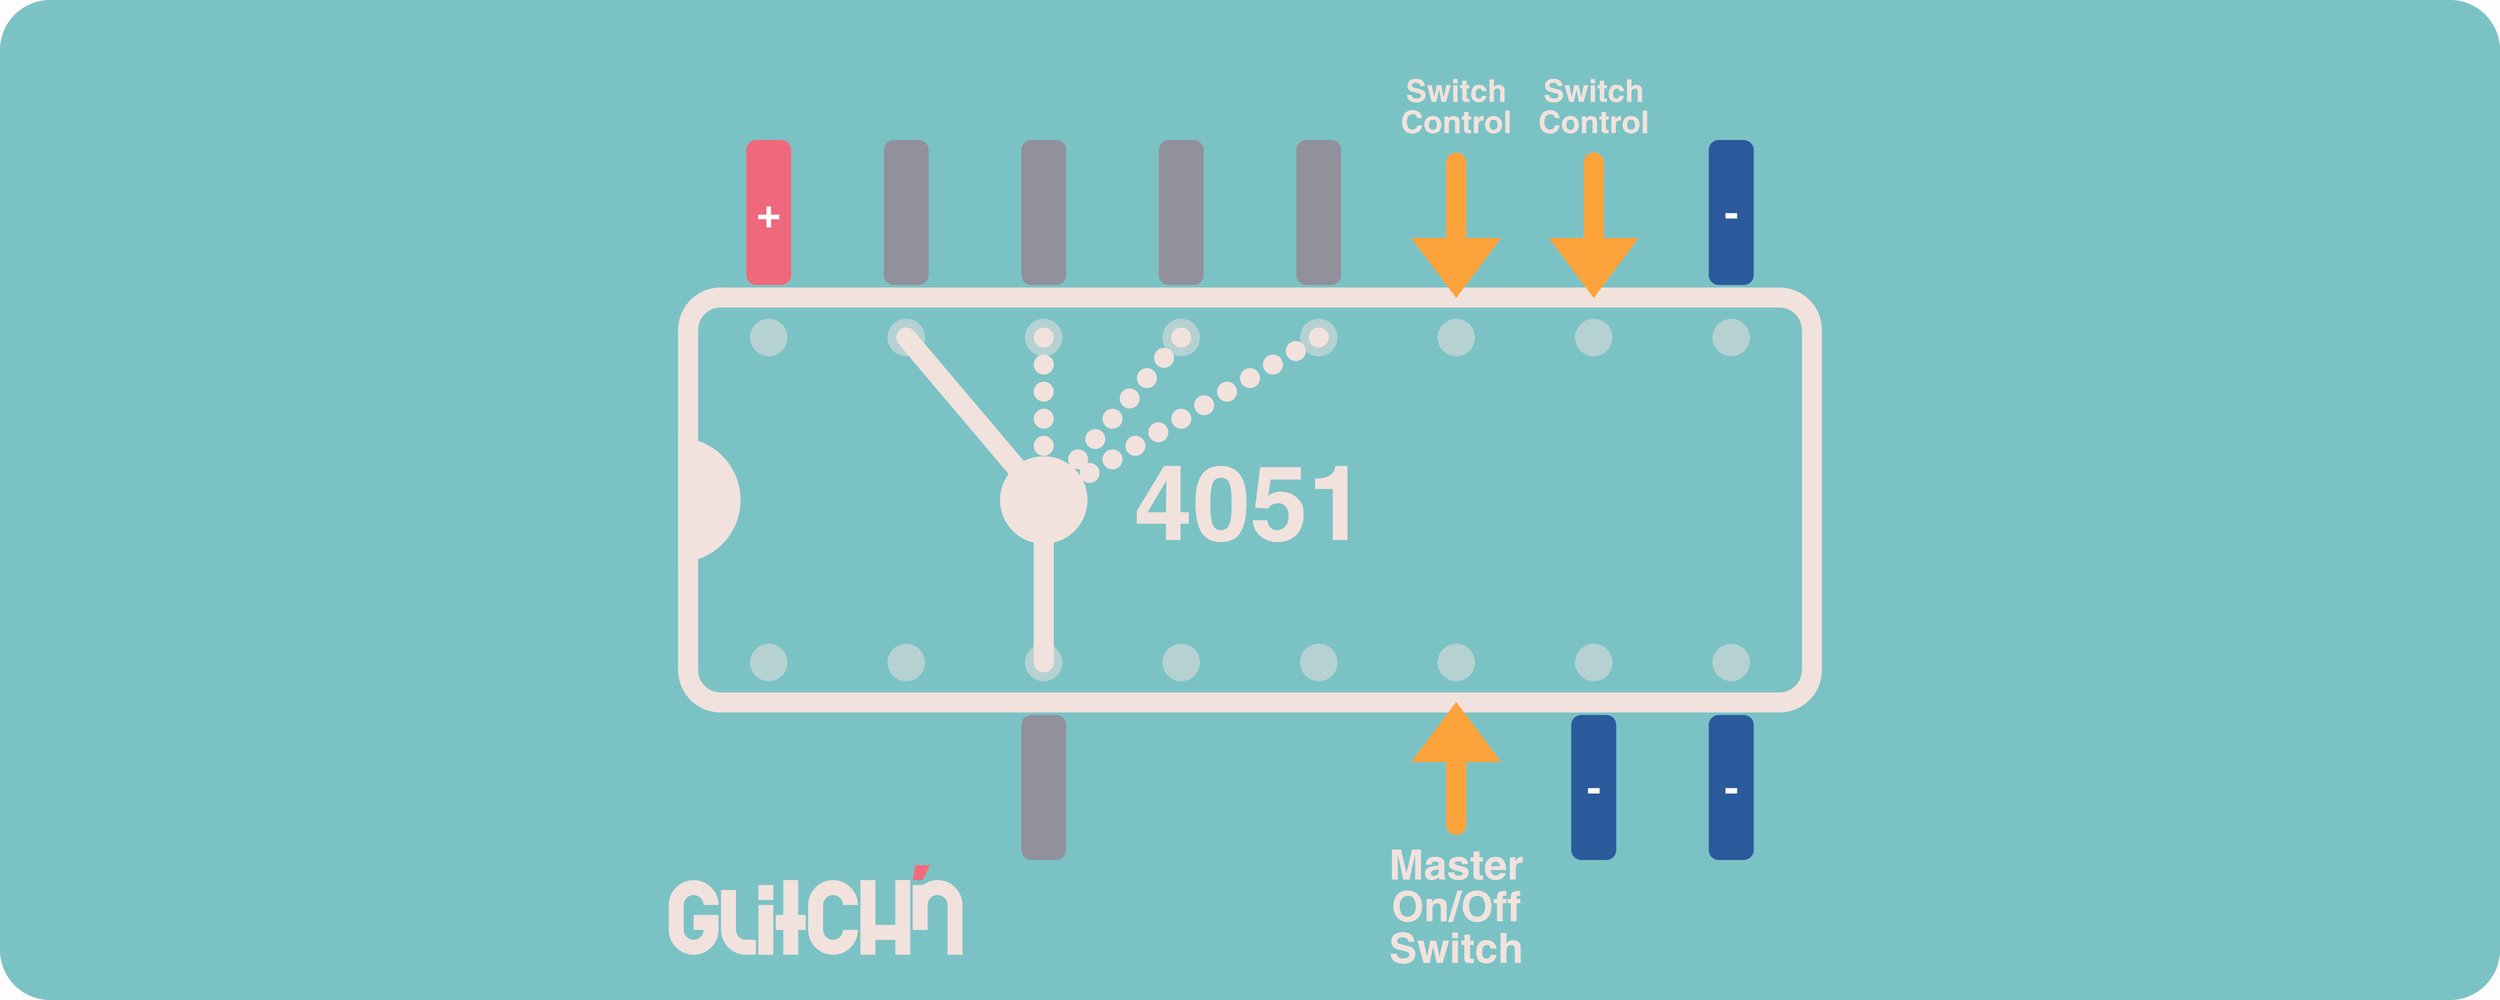
Lesson 2: Automatic Switching with the 4051
Now we use those two oscillators to control an automatic switch, the 4051. We use LEDs to visualize the activity of the switch.
-
Lesson 3: Add a Third Oscillator
Add a third oscillator and use this as the input to the switch. Instead of the LEDs remaining solid at each output of the switch, we can make them strobe. To make them dimmer, we can use a 10K (orange) rather than 1K (red) resistor.
-
Lesson 4: Stepped Low-Pass Filtered "Clicks"
We remove the LEDs and add resistors of various sizes (1K and 10K, which you’ve been working with, but also some new values, 4.7K and 22K). We are building an automatic “stepped” filter that changes the tone of the clicks made by the third oscillator.
-
Lesson 5: Stepped Low-Pass Filtered Tones
Speed up the third oscillator by replacing its capacitors with a smaller one to give us tones (10 uF).
-
Lesson 6: Stepped Band-Pass Tones
To really sculpt our sound, we add a high-pass filter to our third oscillator before it goes into the 4051. Technically, this circuit is now a “band-pass” filter, a fancy name that simply means we are removing low as well as high frequencies in our sound.
-
-
Day 5 - Freestyle Noise with the 40106
-
Lesson 1: Prepare Three Oscillators
Prepare three oscillators: slow (100 uF), fast (10 uF), and very fast (1 uF). Listen to them to make sure they work.
-
Lesson 2: Modulation Network
We add a ring of diodes so that the three oscillators interact and affect each other. Test the sound as you add the diodes one-by-one.
-
Lesson 3: High-Pass Filter
We set up an adjustable high-pass filter to tame the sounds we’re generating. The noises we make now become much more suitable for musical purposes - we want to tickle our ears with these pleasant microsounds.
-
Lesson 4: Voltage Starving
Adding voltage starving to this circuit opens up a whole new world of interesting noise, static, and electrical textures. Try to find subtle, shimmering textures in your circuit.
-
Lesson 5: Searching for White Noise
By adding voltage starving, we are “breaking the rules” about how these circuits are supposed to work. Let’s break some more rules: try removing a component and see what it does to the sound your circuit makes. Removing the 1 uF capacitor from this circuit, for instance, gets us something close to white noise.
-
Lesson 6: Spooky Action at a Distance
Try removing the diodes now to see what happens to your circuit. Oddly, even with the diodes removed, manipulating the speed of the oscillators changes the sound of our circuit, even though two of them are no longer connected to the audio path. This is due to the voltage starving, which creates strange interdependencies.
-
Circuit Kit Components
Stickers & Interfaces
1 x Box with 6” Glitch’n Sticker
1 x 3” Glitch’n Sticker (unmounted)
1 x Breadboard (we use and recommend Elenco breadboards)
5 x Button
5 x LED
6 x Potentiometer (aka “knob”)
Parts Received in Class
AM Radio + 68 pF capacitor
Assorted resistor values for Day 4 (4051) activities (e.g., 4.7K and 22K)
Power, Audio, Connectivity
1 x JBL Go2 Speaker (any battery-powered or rechargeable speaker with an aux port will do)
1 x 9V Battery
1 x Stereo Audio Cable
Assortment of pre-cut wires (many short and medium + a few longer ones)
Core Circuitry
2 x 40106 IC
2 x 4051 IC
2 x 4040 IC
2 x 4021 IC
3 x photocell (tiny disc with squiggly line)
5 x diodes (small red tube with black stripe)
5 x 1K resistor (red stripe!)
5 x 10K resistor (orange stripe!)
5 x 0.1 uF capacitor (tiny, yellowish)
3 x 1 uF capacitor (can shaped)
3 x 10 uF capacitor (can shaped)
3 x 100 uF capacitor (can shaped)